A long-awaited hinterland Dress

1F1A5F7B-5942-482C-8AD3-73E0B2BE0A78.jpeg

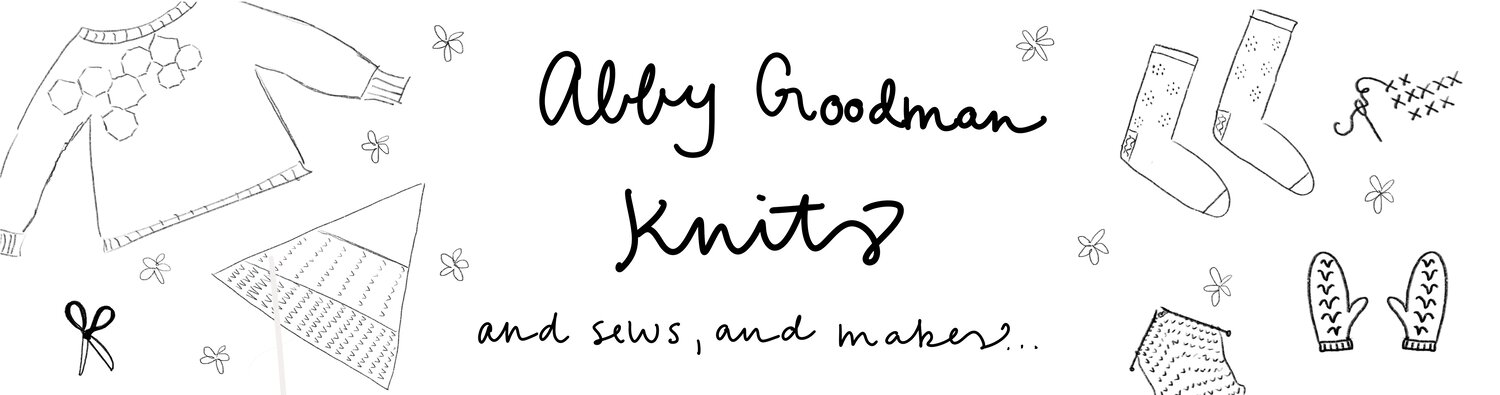
Should you follow along in my knitting and sewing adventures on the blog with some regularlity, you’ll remember that sewing up a Hinterland dress by the talented Meg has been on my list of to-makes for, well, about 18 months. I purchased the fabric and pattern something like last February and there they both stayed for the longest time. Once again a small fear ballooned in my brain until the idea of actually putting scissors to paper and needle to thread seemed too too much against the dreaded unknown of buttonholes and sewing buttons on a garment. I toyed with the idea of a pattern modification to omit the buttonholes, but they really are a key feature of the pattern and really make it the special thing that it is. I thought, “Snaps could be a good substitute!” But resisted the urge to consume more craft supplies in light of the only reason for my consumerism would in fact be the fear of using something I had. I sewed dress after dress and jacket and knitted sweater, took on knit fabrics and gathers and in-set pockets but firmly avoided buttons. (I am very good at procrastinating when I set my mind to it.)

As with 99.99999% of things for which I have an irrational avoidance, one day I woke up and decided that Enough is Enough and I am sewing these buttonholes today. I reasoned with myself, “Just do one step at a time!” and before I knew it, I had sewn my first placket, gathered a little sleeve, and this dress was looking distinctly ready for buttonholes. And then, I just went for it (after a practice or four on some scrap fabric). Turns out, sewing machines are very good at sewing buttonholes and it was over in about five minutes. And wouldn’t you have guessed, I love these little buttons, slightly crooked though they may be, and am very invested in sewing at least two more of this dress, buttons and all.

The fabric is a linen/cotton blend I purchased at a big box fabric store. I did, as is likely obvious, the short version of the Hinterland with sleeves and a half-placket. The only modifications I made for this first version were to omit the bust darts, which I generally dislike, and to include the optional waist ties in the back. With my favorite season quickly approaching and the stash-diving already begun, I’ll next put together a kind of colorblocked version with longer sleeves and a little more length, I think. This pattern is very straightforward for a beginner and I would highly recommend it to those who are in search of a delightful and easy dress to wear at home in these hot final days of summer.

F1AA2067-59DA-40E0-8025-DAA214736BA8.jpeg
176292AC-1985-4EB2-861B-9627FEBE9266.jpeg

Building a wardrobe 2020.3.22 - Wiksten Haori (Take Two)

My work-from-home office is also the space where all of my crafts live: my yarn cabinet, fabric storage, sewing machines, tea materials, spinning wheel, etc. My schedule before a few weeks ago was to mainly only use this space on the weekends while sewing or starting new projects, and one of the unexpected small happinesses from being home has been how I’ve paid attention to and used the spaces in my home differently than I previously ever had. Being surrounded by these materials has been super inspiring and has led to a cacophony of new ideas and things to work on. As a part of my effort to stash down, however, I’m trying to remain focused and purposeful in my crafting, with allowances for random new ideas and energy. First on my projects list was a new Wiksten Haori jacket for the spring.

Ever since my last Wiksten Haori (gosh, I cannot believe that was 2 years ago) I have wanted to make another one of these useful, simple, beautiful jackets. I have been eyeing this beautiful cross-stitched fabric (like this, but I purchased mine at Freeman’s Creative). I believe that I purchased 2.5 yards, since I knew I would shorten it and I wanted to make an unlined version using Jenny’s tutorial on her blog.

I made a size M again using the original pattern from Making volume 4 “Lines” and only shortened it by about 2” to make it a little longer than my last cropped version. I also lengthened the sleeve by about 4” and then did a double cuffed sleeve to make it feel a little more polished. I followed all of the modifications for the unlined version until I got to the collar. I didn’t have quite enough fabric to cut out four full pieces for the collar so I had to improvise a little. It worked out great, though, and would totally do this again. Here’s basically what I did:

  • Sewed the two pieces together at short ends to make one super long strip (as directed)
  • Folded over both long ends 3/8” towards the wrong side on both sides
  • Lined up one long side with the collar seam at the center back neck and pinned one long, folded side to the raw edge of the collar and sewed at together.
  • Like a quilt binding or like a folded skirt waistband, I brought the other long folded edge around to the inside of the jacket and overlapped the 3/8” fold over the seam I just made by securing the collar to the raw edge, pinning into place. Now the seam is enclosed behind my nice fold!
  • From the outside of the jacket, stitched in the ditch slowly to not break any pins all the way the length of the collar and secure the inside folded edge. Took out the pins and ironed a nice edge for the collar.

I finished sewing and basically didn’t take it off for two days. It’s so comfy and perfect for layering inside my chilly house for hours on end. Looking forward to styling it with some dresses and jeans soon as well.

Obsessed with these lil checks

Building a wardrobe: 2018.5.20 Winslow Culottes

Feeling ever emboldened by my success with the Wiksten Kimono Jacket, I finally felt confident to consider sewing myself a pair of pants (!!), specifically, the Winslow Culottes. Let me preface this by saying that culottes are perhaps the most forgiving pattern one could possibly choose when it comes to actual sizing for the lower half of your body while still claiming to be pants, which for me was exactly what I needed. Pants and I have always had a difficult relationship, my hip to waist to thigh ratio being a bit...dramatic. For this project, however, the cut of the pants are so flowy that you don't actually need to measure anything but your waist! Curvy girls rejoice. 

I cut the second length of these and they hit almost perfectly at the knee, using a drapey fabric that I can't quite identify that I purchased a while back from The Scrap Exchange. The directions for this pattern were extremely straightforward, but for difficult moments Helen's Closet also hosted an incredibly helpful Winslow Culottes Sewalong that I highly recommend for anyone who is considering sewing the pattern. It was my first time using my invisible zipper foot and save for a slight issue at the beginning that was quickly solved with my seam ripper, totally doable! My only other regret was not using paper-backed interfacing. I had a bear of a time trying to incorporate interfacing that wanted to cling to everything it touched as soon as an iron came near and would recommend you use a good-quality, stiff interfacing for the waistband unlike what I chose. 

This pattern is extremely wearable and has already been a go-to piece for my summer wardrobe! They give me the practicality of pants while acting, and often looking like, a skirt. Win win win. For the fall I would love to figure out a way to cut a stretchier black knit version of these in a longer length, perhaps with the gathered waistband hack that Helen graciously provided as well. 


Building a wardrobe: 2018.2.20 Wiksten Oversized Kimono Jacket

For my birthday this year, my sweet husband relented from his desire to surprise me and I purchased myself a secondhand Janome Magnolia sewing machine to celebrate my 27th year of living. It's not an exaggeration to say that having a machine that runs as well as this one does, with the functions that it has and the possibilities that it opened up for my sewing life, was nothing short of a game-changer for my wardrobe this year. (Also, you know you're a nerd when you spend an entire night practicing making buttonholes on scraps of fabric just because you can DO that now. But we won't dwell on that.)

I decided to christen my beautiful new-to-me machine with a really challenging make (for me). I fell in love with the Oversized Wiksten Kimono Jacket from the time that I saw it on Jenny's feed in the most recent Making zine and had to have one. I combined a black semi-mystery, cotton blend fabric I purchased at the Scrap Exchange with some wonderful linen-rayon from Freeman's Creative and am so happy with this piece, even with its many imperfections. 

 That That "I'm just so excited I just finished this thing late at night" feeling

The only changes I made to the pattern were to shorten the jacket by about 5". I wanted more of a cropped, boxy look but I kept the pockets the same placement and size because I also LOVE a generous pocket. I made the size medium but for a more fitted fit would have gone for the small. All in all, the instructions were really clear and easy to follow, especially since this was my first fully lined garment!

We had such a weird, long winter this year that I have already gotten a great amount of use out of this piece, and the two neutrals have gone with a lot, including some darker prints I have in my closet. 

Since its debut in Making, Wiksten has also published a re-worked version of this jacket for sale as a paper pattern, so if you found yourself wanting this jacket with some modifications, check that out.